Track your staff's sales performance and measure their success.
Define new users, set their access level, and track their sales performance to help them to improve based on these numbers. You can deactivate an employee in the low season and re-activate him when needed.
This is the common point to add a user for both locations and select the roles based on the location.
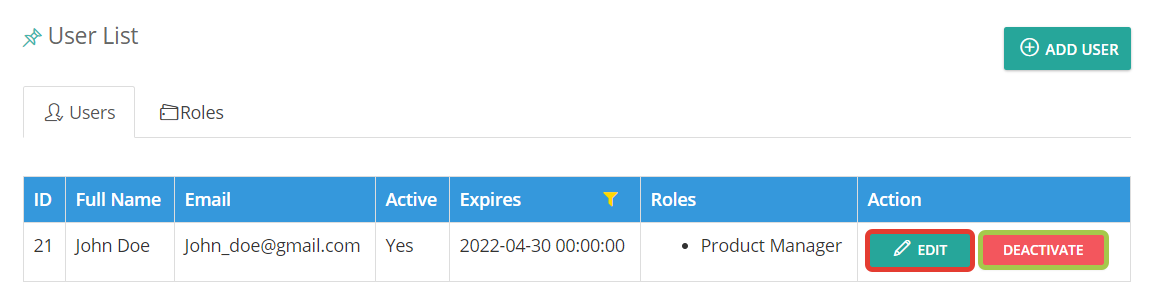
Adding users into Rentrax, assigning him/her a role, and choosing the list of permissions that they are eligible to manage. Go to the dashboard and then click on “User Management”.You may simply add new staff or change the roles of any existing employees here.
ADD ROLE
Click on the “New Role” and assign it to the staff.
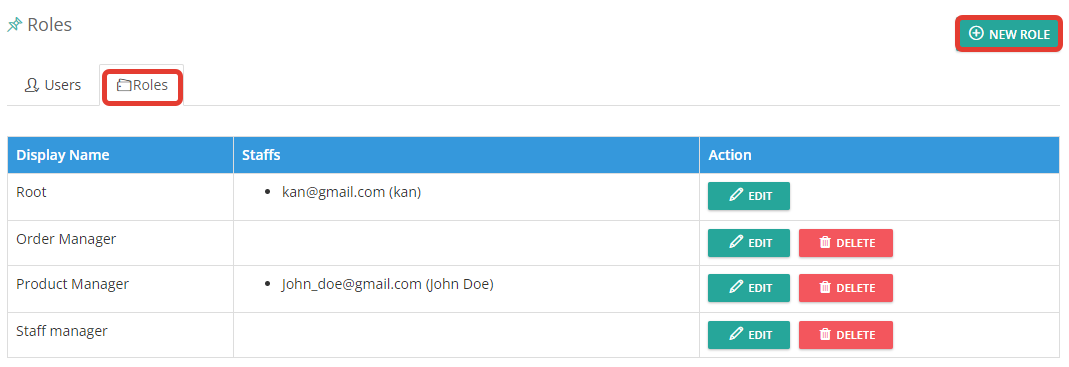
Enter the Name of the Role and select the list of the “Permissions” that you are giving the authorization to access for that particular role and click on Save.
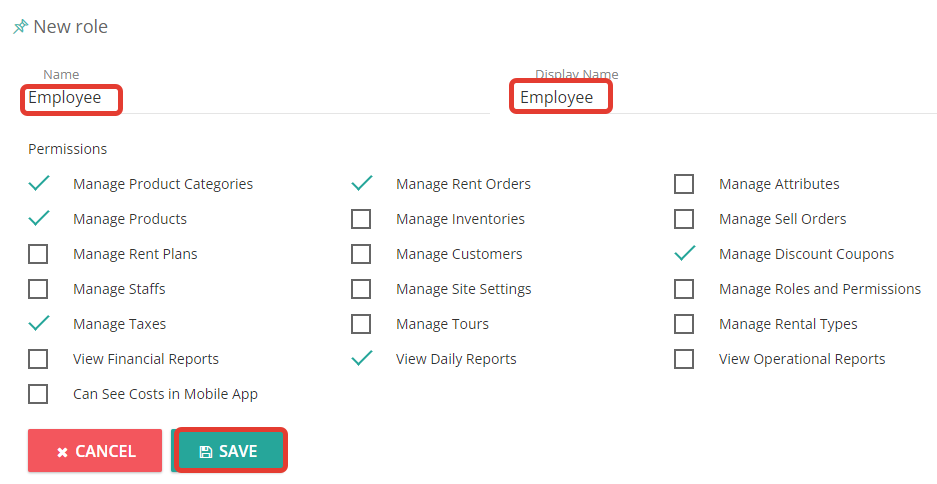
Manage Product Categories: Managing the parent & child categories.
Manage Rent Plans: Managing/Changing the start & finish rental plan periods.
View Reports: Giving access to view all kinds of reports.
Manage Roles & Permissions: Enabling/disabling the roles & permissions of a person belonging to a particular role.
Manage Rental types: Managing all the activities like Bike, Ski, Camping, etc.
Manage Rent orders: Managing the rent orders like confirming, delivering, returning, and closing the orders.
Manage Inventories: Managing the Inventory like adding products, changing the status of the products, scheduling the maintenance, etc.
Manage Customers: Creating the customer's profile or changing the existing customer credit card information.
Manage Staff: Adding new staff, deactivating the existing staff or changing the user account expiry, etc.
Manage taxes: Adding/deleting the new taxes.
Manage Attributes: Managing the product attributes or category attributes or renters attributes.
Manage Sell orders: Managing/placing the sales orders like SKU products or sale items.
Manage Discount coupons: Managing all types of coupons.
Manage site settings: Managing the business settings, location settings, & activity settings.
Manage Tours: Managing the Tour activity or not.
View Financial reports: Viewing the Payment summary report, Detailed revenue report, Category revenue report & Products report.
View Daily reports: Just giving access to view only daily report for today & yesterdays revenue & orders.
View Operational reports: Viewing the Delivery report, Coupons report, Rent orders report, Sale orders report & Ad-hoc report.
Can see costs in the Mobile app: Enable this checkbox to restrict someone to view the prices on the Mobile app(like delivery drivers).
ADD STAFF
Click the “ADD USER” on the top right to allocate the staff for that employee role.

You may add the name of the Staff, Email & Password are required to log in to POR. An access key is required to perform some actions like Cancelling orders, changing price templates, Refunds, etc. Expires on (set a date when this staff can have access) and select the Role for this staff. Click on Save.
An access key is unique and it is required to perform some actions like Cancelling the orders, Modifying the price templates, and Refunds. Don't set the access key if the staff doesn't have permission to do.
Select the default location. It helps that users whenever they log in by default they land in a selected location.
Select the roles of that user for each location.

Click on Save.
Once the user account is created, you may click on the “EDIT” button to edit the staff or can click on the "Deactivate" button to deactivate their account.