
Our Client Success team will be in touch with you shortly after you activate your first Rentrax subscription and will help you set up your first instance with us.
In this article we want to let you know what to expect from our first Onboarding meet
Rentrax is designed based on your actual needs and to be able to get the most out of it, it needs to be configured and set up according to your own requirements. Depending on business size, data availability and the amount of time and effort you put into it, the onboarding process may take from hours to weeks. Once a new client signs up and activates the account, a ticket gets generated by the system to make sure all steps during onboarding are being tracked and monitored.
During the onboarding process, you may have 3-4 online meetings (30-45 min each) with a client success agent who is in charge of onboarding and making sure you and your staff are fully onboarded. We also spend plenty of time behind the scene to prepare the online rental shop for you. Onboarding process is a mutual activity that needs to be carried out with full cooperation between you and the Rentrax Client Success team. However, the party who really needs to work on setting up the account is the client itself. Of course, our client success agents are always here to guide you through the onboarding process and answer any possible questions you may have.
Following flow diagram of the onboarding Process, depicts the onboarding steps and responsibility of client and support agent.
Note: Setup fee paid by client is to partially cover the cost of time and effort (up to 5 hours) our employees put into setting up your instance during onboarding and training your employees. For large businesses that may take more than five hours from support agents, extra cost may apply.

How Rentrax Works:
Rentrax is end to end software designed from experience for equipment rental businesses and Activity and tour service providers. It is very simple to use and understand, yet very sophisticated and complex in design and coding. Each activity type, like bike rental/tour or ski rental has its own needs and requirements. That’s why Rentrax comes with a different high-level setting & configuration for each activity type. For example, what a snow equipment rental needs is different from what a bike rental needs. At a more granularity level, each business/shop even in the same field, may have different requirements and needs. For example, two bike rentals may have different needs; one might be a high-end bike rental with few but expensive inventory and customers who rent for a few days, and another one a beach cruiser rental with plenty of bikes and short period rentals. We have taken all these complexity from front end to our design and back end so that our clients and their customers work with simple and user-friendly software.
To understand it better, let us give you an analogy. Your instance (online store) with Rentrax is like a home with multiple rooms. There are three different types of room; Rent, Borrow and Sale. In a rental room we keep rental items, in a borrow room we keep borrow items and in a sale room we keep sale items. You can have multiple rooms of each type. Rooms are our parent categories. Each room has multiple closets which are our child or product categories. We keep our items/products in the closets. Items can be uniquely numbered (SKU) or have no number. If we want to be able to track each item, it should have a unique number. Whatever configuration we set for a closet, such as maintenance, security deposit, delivery cost, product attributes and even the product picture on the closet applies to all items in that closet. For example, if one closet is set as SKU base, then all items in that closet should have a unique number; if the security deposit for a closet is set on $100, it applies to all items in that closet. Also, all items in one closet follow the same pricing rule. For example, if we set the closet pricing as $30 first day and $25 second day, it applies to all items in that closet.
It is possible to have more than one activity type. For example, some businesses do bike rental during summer and ski rental during winter. In such case, they need to sign up for two activity types. It’s like building another floor on top of the first one. Second activity type is eligible for a 30% discount and the third (and more) activity type will get a 50% discount on subscription fee (1st, 2nd and 3rd are Price vise).
With this explanation, let’s start setting up your instance.
Step 1: Category Structure
The first and most important step to set up an online store is to categorize the inventory.
Categories can be divided into three major types.
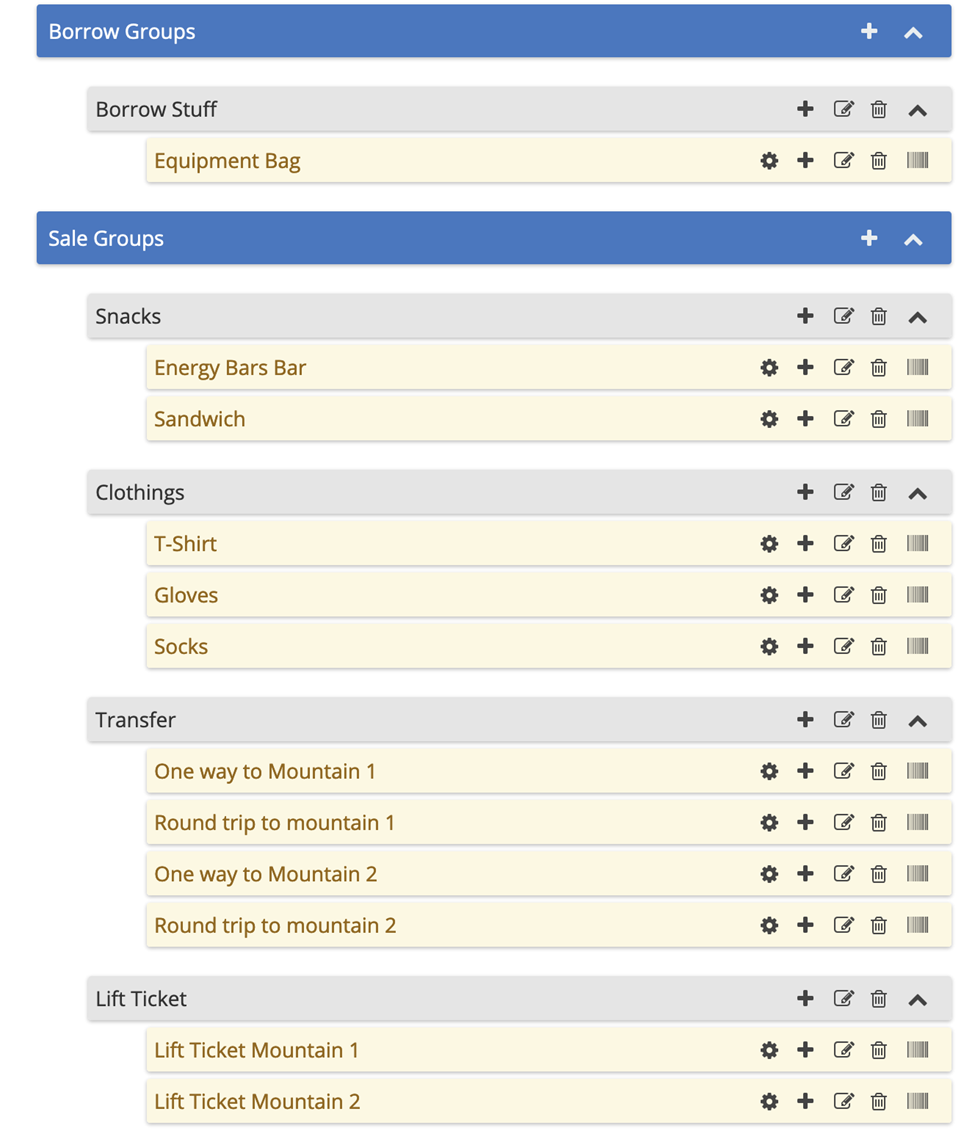
- Rental Type: The inventory under this group will be delivered and returned and charged base on the predefined pricing rules
- Borrow Type: The inventory under this group will be delivered and returned but there is no cost associated with these items. Yes, they are free.
- Sales Type: The inventory under this group is for sale only. They can be added to a rental order or sold separately. Used rental fleet also can be moved to this group if they are tagged for sale.
Each category type should have two levels of categories: Parent category (room) and product category (closet). Each parent category can consist of multiple product categories which contain products.
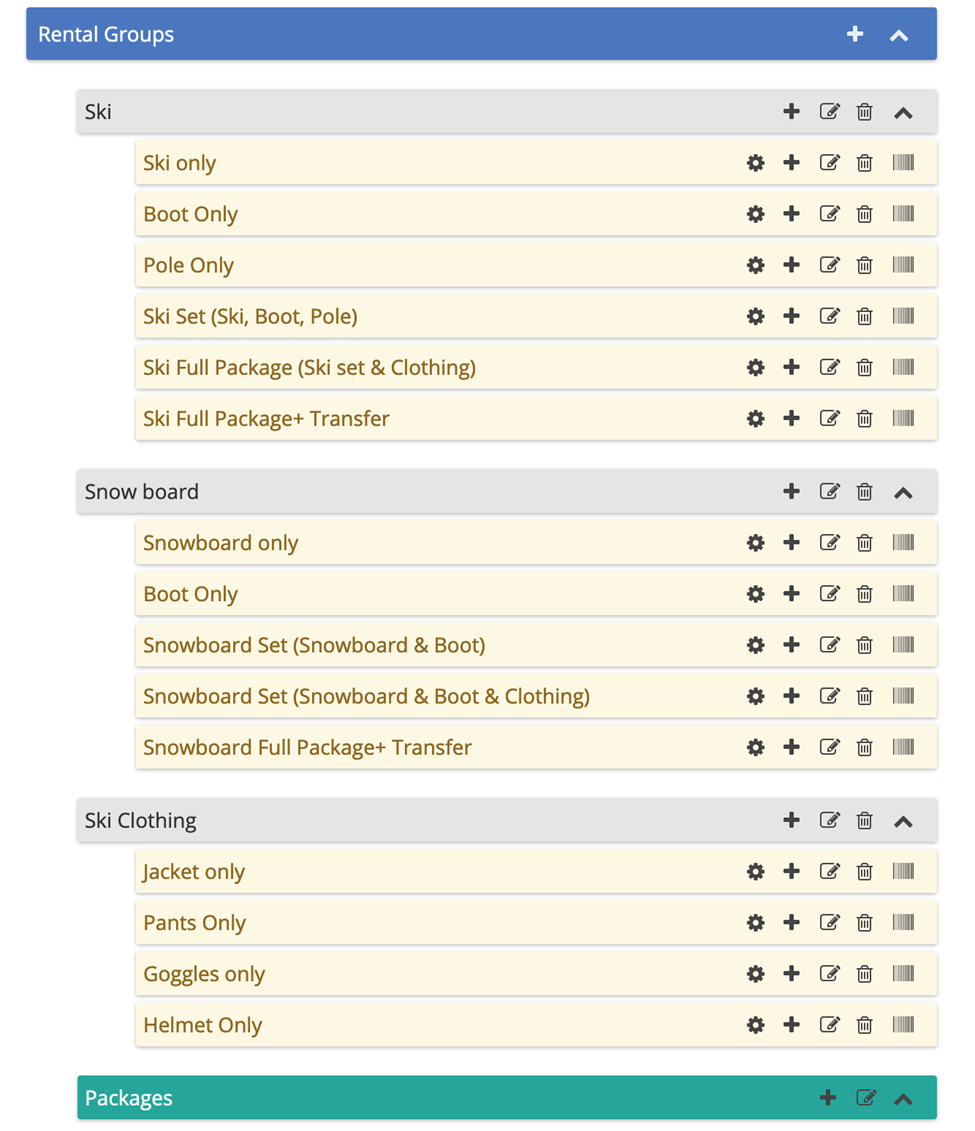
There is also a built-in category for packages. A package is like a product category which has multiple items in it. For example, a ski package may include Ski, Boots and Poles. The pricing of a package is independent from the pricing of the included items.
Also, a package can be set to be displayed under other parent categories. For example, a Ski package can be displayed under the “Skis” parent category and a Snowboard package can be displayed under “Snowboard” parent category. Following screenshot shows a sample category structure.
Example: Ski Rental Categories
This document is supplemented with a relevant Onboarding Template spreadsheet.
Below please see a diagram that shows how to understand and fill out the first sheet of the template (Category Structure):

So, your first task is to design your category structure and send it to your support agent.
Step 2: Product attributes
Each product can have different attributes such as SKU, serial number, color, size, Brand and so on. Some attributes are already built in and can’t be modified but you can define your own attributes as well. Attributes are at Activity Type level and applied to all products no matter which category they are assigned to. Attributes can be mandatory or optional. Mandatory attributes should have a value for all products and if an item has no value for a mandatory attribute, the product import won't happen. For example, if size is set as a mandatory attribute for a category, then all products of that category should have a value for size.
Built in attributes:
Except SKU, Category, and subcategory which are product identifiers, other product parameters such as Serial number, Cost, MSRP, min sale price, Brand and so on are product attributes. Product attributes are being used in different places in software especially in reports. But the most important use of it is to filter products when your customers place an order or when you assign a product to a customer. At the moment, each category can have only one attribute, say size, to filter products when your customers place an order. In the back end, when your employees try to find and assign a product to a customer, they can have one extra attribute to filter the products such as Brand or type.
So, your second task is to list all product attributes you need and send it to your support agent.
Step 3: Business setup
There are many other small things that need to be configured so that your instance works fine. Your business information, regional setting, your payment processor, taxes, order form setting and many other things need to be configured. We will walk through these settings in our first Onboarding Session.
Step 4: Product Import
When the category structure is built and attributes are defined, then products can be entered. Although a new product can be added to the system on the product page, the best and fastest way to enter products to the system is using a csv file for mass import. To do so, you need to fill out the third sheen in the Onboarding Template document.
There are some mandatory and some optional fields. Clients also can add as many columns as needed to the right of the table. This information will be saved in the system.
Each row represents one individual item and must have a unique SKU.
- SKU - mandatory field. Unique for each individual item. We can generate SKUs if the client doesn't have them.
- Parent Category - mandatory field and must be one of the Parent Categories listed on the first sheet of the document
- Child Category - mandatory field and must be one of the Child Categories listed on the first sheet of the document
- other fields are optional.
Client may also add more columns to the right of the table if needed.
Step 5: Pricing rules
The next step is to define pricing rules which says how the rental cost will be calculated for rental items. After defining a pricing rule, it can be assigned to one or many categories and all items within that category will follow the same pricing rules. In other words, all products under the same product category share the same pricing rule.
Please provide your price list and include as much detail as possible. Some questions to consider:
- What are possible rental durations available for customers? Is there any maximum?
- Is there any grace period for late return?
- Prices should be defined for each product category and each possible rental duration.
After receiving this information, we will access your price structure and will get back to you if any clarification is needed or if any requirements cannot be supported in our system.
Step 6: Waiver
Text of the waiver/ terms & conditions must be provided in .doc format.
The waiver can contain small pictures (something like a logo at the top). But there shouldn’t be any important text pasted as a picture, because on small devices (like smart phones or tablets) it won’t be readable.
Also, there shouldn’t be any background pictures. If you’d like to emphasize the most critical parts of the waiver, please use the text editing toolbar.
Rentrax supports two types of waivers / terms & conditions, available to PRO plan users:
- Basic T&C: can use the following parameters to prepopulate from Clients’ info: @order_number / @order_date / @sign_date / @first_name / @last_name / @full_name / @guardian_first_name / @guardian_last_name / @guardian_full_name
Paragraphs containing guardian information will only be displayed if someone is signing as a minor.
- Enhanced waiver uses parameters supported in Basic T&C AND the following: @initials / @signature.
Step 7: Pictures and product descriptions
We recommend using pictures with 4x3 ratio (for example 400 x 300, or 640 x 480 pixels). Square pictures will look good too. Recommended file size is between 50 and 200 KB.
Rentrax supports all most popular image types.
Image shouldn’t contain any transparent elements.
Short video tutorials:
Business logo and Invoice (grayscale) logo can be uploaded from Business Settings.
More information about our features and settings can be found in this Knowledge Base with short “How to …” videos and detailed tutorials.